Showing posts with label S.KOREA: ulzzang. Show all posts

3.21.2012

specs


Korean clothing store (www.aboki.net)
Ulzzang model (Park Hyung Seok | 박형석 )


[[ source: fuckyeahaboki tumblr ]]

2.12.2012

Ulzzang Tidbit: the importance of the Highlighter

THE  H I G  H  L I G  H T  E R .


The usual pale and matte-BB-cream-face is the Ulzzang's obvious first step. However, it is excruciatingly :( important not to forget that having no highlighter on your matte BB cream foundation will only make your BB-creamed-face look dull. and perhaps cakey. Options that you have:

[a] apply highlighter on top of bb cream
[b] mix 1/3 creme highlighter with 2/3 bb cream and apply all at once
[c] use a mist, like the ones sold at StyleNanda, all over your face.


- - -
If you chose [a], then refer to 2. highlight of the below picture to see where highlighter should be applied:
BUT WAIT! add a bit of highlighter on your chin so it gets some attention!

- - -
If you chose [b], then... apply 1/3 cream highlighter with 2/3 foundation.
The highlighter I use is the Benefit high beam.
Quick review:
(+) does the job
(+) natural if you put the right amount and mix well with skin and foundation
(-) put even a little too much, it will look obvious in the sun
(-) doesn't look pretty on dry skin, but that's for many things

The BB cream I currently use is the HanSkin Silky Treatment BB Cream SPF 50
Quick review:
(+) refreshingly silky on my slightly drier-than-normal skin
(-/+) gray tones. not sure if this is good or bad because most bb creams are gray
(-) incredibly pale if you put too much

- - -
If you chose [c], then you have chosen to go a little outside the "Ulzzang look" and more into the Nanda look, otherwise known as inspiration from the fierce and sexy models (as opposed to the reserved and innocent Ulzzangs) from the S.Korean online store NandaGirls. (en.nandagirls.com) has created the glossing face mist as a part of the 3concepteyes collection. (Another option is the glossing body mist)
You can choose to spray after applying makeup and foundation for a very glossy-Nanda look.
However, to achieve the Ulzzang look, apply the mist before foundation for a subtle and dewy look.

here's a photo of a very glossy-Nanda look
Buy it HERE. [[ photo creds to stylenanda ]]
Here's a photo of a dewy-Ulzzang look (with Nanda attitude :)
- - -
[[ photo creds to stylenanda , sephora, yesstyle, tumblr, + myself<-lol]]


>I hope that this helped and that now you won't forget to apply some sort of highlighter! Ulzzangs aren't all about flawless pale skin: they also want a healthy dewy glow.
So, have fun and good luck :)

1.08.2012

Tidbit: Ulzzang Lips

In the next few days/weeks, I'll be making posts on specific areas on becoming an ulzzang!
So, to start off:

The   L  I  P  S .

source: tumblr//original

What we want to achieve:
+ pink-red pout.
+ a bit of shimmer, not sparkle, concentrated on the middle bottom lip and middle top lip
+ matte on the areas without the gloss
+ soft kissable lips!


P  R  E  P :  
 Condition your lips using any of these methods, or any method you know (care to share?):
1. The Sugar-Sweet Lips Method.
Take a tsp or so of sugar and mix it into a some Vaseline. Dab it on your lips and let it sit for a minute. Gently rub your lips in a circular motion, then rinse off with water. Apply a moisturizer after or else your lips will be dry !! This is a good method if you're going on a date: your lips will still be slightly sweet ;)
2. The Toothbrush-Plumping Method.
Take a toothbrush and gently rub your lips: concentrate on the outer corners: it's not as sensitive as the middle. Use a moisturizer after. This gets the blood pumping to your lips so your lips will become naturally red and plumper!


The   S  T  E  P  S :
1. Did you exfoliate and moisturize yet? Good: next step!
2. Apply lip stain for a more natural look
3. Take a lip liner the same color or close to your lip stain
4. Line your lips and slightly go outside your natural lip line at the middle bottom lip and at the middle top lip

5 Blend.
6. Take a translucent powder and dab it on your lips to matte and set your lip color even more.
7. Take a red gloss and dab it, concentrating on the middle area of your lips. Especially the bottom middle lip.

8. Use a highlighter and add a bit on your cupids bow. Blend~
9. Done!


Now the guys won't stop thinking about those lips of yours ;)
P.S. I think when you see letters written in bold maroon, it's like a double emphasis haha. But definitely don't overlook the bold black letters!
Adios!

11.23.2011

Ulzzang: Popular Hairdos and Hairstyles

So, I've come back with another Korean hairstyle + hairdo trend post, as my previous Popular Korean Hairdos post had a great amount of views ^^. For this post, I'll be focusing on Ulzzangs:


Slightly curl your front bangs to give it a little 'oomph' and braid some pigtails~ Braid it till almost the very end so it curls a bit
Add an oversize bow if you'd like.

If you don't want braids, use big curls for you pigtails 

Have wispy hair on either side of your face
Roll up your hair, scrunch it a bit, and tie the bun= messy bun
(the goal for this ulzzang look is not to look like a ballerina girl!)

And then there's the good-girl hairstyle
Straight, shiny, flawless hair with slightly curled bangs, plus a golden-braided hair band

Choppy and thick front bangs that are cut just slightly shorter is a popular hairstyle
Add waves and curls to your hair + glasses to complete the Ulzzang look

A LOT of Korean girls and Ulzzangs wear their hair like this:
long wavy (or straight) hair with a chunk of hair tied up into a mini ponytail

And lasty this hairstyle:
WAVY not curly hair. You must spray or use some light gel to set this hairstyle (to give it that wispy look, as shown on the model)
Don't forget the hairties!


And that's it for this time !
+ Don't forget to leave a message in the message form (Click on Contact on the right panel) or send an email on what you want to see next! (etrnlsunsblog (at) gmail.com)

-   -   -

Happy Thanksgiving or Tofurkey Day for those who celebrate it!! 
Have a safe weekend ladies (and gents?)! =)

11.15.2011

Ulzzang trends: the knit beanie

You'll often see Ulzzang models wearing knit beanie hats; in fact, you'll see a lot of Koreans wearing them ( ulzzang or not )


☼ Knit beanies w/ the fuzzy bunny-tail puffball
☼ Red seems to be a popular color, but you often see others too: solid/plain, solid/bright, cool prints, patterns
☼ Either wear it loosely so that the puffball is hanging a bit, or if you don't have bangs, wear it nearer your hairline

picture examples:
Do you prefer Simplicity?
stripes + solid beanie + dark plaid scarf = (+)
Buy link: $5.00 [[calm colors]]
Does your closet consist of rockband tshirts/ hipster pieces/ canvas bags?
short curly+messy hair with a knit beanie+ black nailpolish= (+)
Buy link: $10.99 [[solid colors + thick beanies ]]
Do you love that Korean bboy style?
baggy print crew-neck sweater + red beanie + skinny jeans + Nikes= (+)

Buy link: $14.99 [[ slouch knit beanies ]]

Bright colors  might be your thing?
semi-matching plaid flannel + bright beanie + hipster glasses= (+)

Buy link: $9.95 [[bright colors]]
Do you prefer patterns?
Thick fringe/front bangs + hipster glasses + beanie = (+)

Perhaps your style is more hardcore?
Ski-goggles in the form of glasses+ bright hair + beanie with bold word print = (+)

Buy link: $19.95 [[cool prints]]

C'mon, even the kids are wearing them hehe (their beanie-style is a bit different since it covers the ears)
matching tracksuit/hoodie + beanie + cute lil' girlfriend to match and hold hands with= (+)

Oh and of course guys wear them just as much as the ladies!
neutral-tone and patterned beanie + padded vest over under Uniqlo shirt+ hipster glasses= (+)

Buy link: $26.00


☼          ☼         


Next up!:
I think many of us wish we could be Ulzzangs and/or Momzzangs, so future posts will be on Ulzzang Inspo (What's that? Similar to Thinspo, but if you don't know what that is- no worries! Wait till my future posts :)


Have a SMASHING day! 

11.11.2011

NEO DALI Extra Size Brown Review


The Info

BC: 8.6
DIA: 14.2
Water Content: 45%
Disposable: 1 Year
Power: 0.00 to -10.00

These are my first ever purchased circle lenses; however, I believe my review should be reliable enough since I've been a regular contact lenses (Acuvue) wearer for over 2 years now :)!!


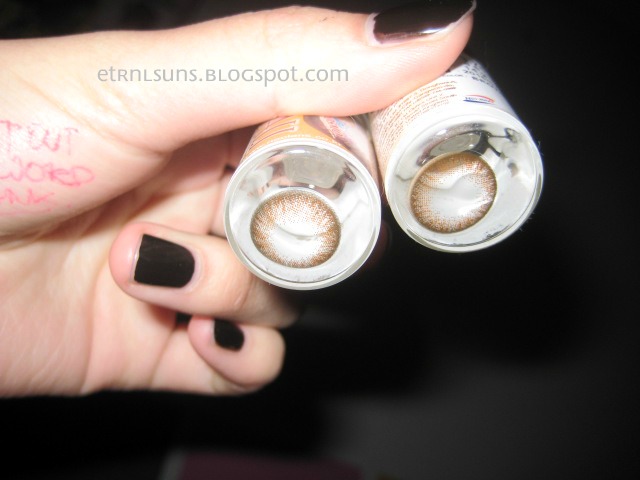
Some pictures of the lenses their selves:
 (Black nail polish! haha I've been obsessing over this nail color lately
Brand: N.Y.C. 
The trick to cheaper drugstore nail polish: at least 2 thick coats) 


the review--

COMFORT:   Comfort is SO important for me since I have pretty sensitive eyes that get dry often. 
+ Feels like there's nothing on your eyes
+ 45% water content!! This is why I chose this

Now, the stuff below is just what I personally did wrong and stuff YOU should AVOID please!!
- seriously CANNOT wear them for more than 8 hours. I wore them for 12 hours and my eyes were dry and bloodshot after removing them (remember, I have sensitive/dry eyes)
- had irritation in my left eye but this is most likely my personal experience, otherwise it would've happened on my right eye :p

! Buy a REALLY GOOD branded contact solution I cannot stress how important this is...(#1 choice: Opti-Fresh Replenish.. buy it at your drugstore, not those other ones on circle lense stores). Do your eyes a favor: spend more so your eyes don't have to burn for the next minutes (which could take up to 2 hours for me)

LOOK:   Ooh, I searched long and hard for the perfect first lenses and i'm sure many of you are also,,!! maybe. Anyways:
+ Natural Design: a gradient of light to a subtle dark brown ring that looks NATURAL thank goodness and doesn't look weird like those not-solid-ringed circle lenses
+ Makes your eyes GLISTEN: I absolutely love this.. it makes your eyes look like they're sparkling (but not so much that it looks like your eyes are glazed over :p )
+ School and Work appropriate

- If you don't have good makeup and hair, it will look weird. No makeup? Bug-eyed but just to some extent.. I had some semi-stares that looked more like 'woah what the-' as compared to 'damn she's fine today' and this was the day I decided to wear almost 0 makeup (oh my cover is blown! kidding, it wasn't that dramatic)

ENLARGEMENT:☀  STOP right here and go no further. 14.2 diameter is GOOD enough, my dear. Any more, and you don't have falsies or lots of makeup, you will no longer look human
+ Sufficient. and this is the biggest I will ever go. I prefer natural please! However, with just the right amount of makeup, I seriously thought I looked gorgeous (ooh narcissist) for a second,, and then i got over myself. sigh

COLOR CHANGE:  I have medium/dark brown eyes that have a amber-red tint to them and these lenses made them lighter a bit in natural outdoors sunlight(where i'll be seen most of the time lol). If you want natural, these are great. If you want dramatic, then don't.
+Light eyed people: great color change

- Dark Brown to Black eyed people: not much of a color change, unless that's what you want

Wooooh~ that must've been a b*** to read. just kidding :3
Here are the before and after pictures!
W/OUT lenses.
This picture is from my Ulzzang makeup tutorial w/out circle lenses.
With lenses + natural light
Isn't it glisten-y beautifulness? <3
WITH lenses. + Indoors Flash
LOL trying to open my eyes lOL... to show the size of the lenses you racist..
Dark indoors + flash
Closer close-up: I spy PIXELS! but SO freakin' tiny, no one will notice unless they tried
They almost look green/hazel... maybe that's just me
No flash + natural light indoors facing the side opposite to the light
Q:Where did I get them, you ask?
Here~ click me! [[got mine in 1.5 weeks which is pretty darn fast since it shipped from HK and I live in NorCal]]
Q:What's on my face, you ask?
No mascara, semi-curled lashes -.-, Elf kohl eyeliner, Bronze eyeliner


And that's all I have!
Hope this annoyingly long review helped you make your decision =) So, like I said, there were days when I had good makeup that made these circle lenses work, si? Ouai~ so stay tuned for those tutorials!
did you check out my Ulzzang tutorial w.out circle lenses yet? :3

10.20.2011

Ulzzang Clothing: website find

I cannot believe I found a store that sells Korean (specifically Ulzzang) clothing that's almost as cheap as how much you could buy it at S.Korea... that sends NOT just within Korea (well besides gmarket and yesstyle)


Anyway, I present thee....


Check out the website to see everything else!

10.17.2011

[Basic] Ulzzang Makeup WITHOUT Circle Lenses

Here I present you all with my Ulzzang-inspired makeup look. However, I know many people new to this Ulzzang style do not have the 'materials' to get the Ulzzang look; so, this tutorial will be done:

  • WITHOUT circle lenses
  • WITHOUT falsies
Quite a few Ulzzangs have double-eyelids; however, quite a few do NOT. It's your choice to use eyelid glue/tape, but I will not being using any in this tutorial.

All you need is:
  • Brown eyeliner or shadow
  • Black shadow w/ angle brush OR eyeliner
  • Angle brush OR Eyebrow pencil
  • Highlighter ( Could be pearly creme eyeshadow if you don't have a highlighter)
  • Light Bronzer (i'm using powdered)
NOTE: I ONLY DID MAKEUP ON MY LEFT EYE (you'll see it as my RIGHT eye)
- - -
Apply Concealer and BB cream/light foundation as needed
- - -
STEP 1: tight-line your upper water-line
   Notice how my right eye looks darker? When you close your eyes/look down, it looks like you're not wearing makeup at all~!

STEP 2: shade in your brows

  • EXTEND the top inner corners towards each other
  • EXTEND the ends downwards
  • Make it full and natural


STEP 3: Use your brown eye pencil and line your eyes
  • Start from the middle (concentrate on this area to make the appearance of bigger eyes)
  • Extend the ends and add a tiny BLENDED tail


 STEP 1: Form a V on the end corner and the inner corner

  • Extend the wing down to the bottom line, BLEND out.
  • Start from the inner corner and line the tear duct area
  • The Bottom middle should either the least or no eyeliner

STEP 4: Apply a light mascara (Maybelline Great Lash is natural) and Curl lashes
- - -
STEP 5: Highlight AND Shade  [ look at my chart! ]
  • RED: use Bronzer to shade
  • GREEN: use Highlighter to bring out features
  • BLUE: summing up the previous steps


- - -
STEP 6 : Apply pink~red lipstain. Light gloss is optional

- - -
And that's it ..!
There'll be future makeup tutorials involving other tricks and colors.
As well as a tutorial WITH circle lenses, falsies, and eyelid glue
hehe...
so,, subscribe! ^^ [right side link]